In today’s fast-paced business environment, a Point of Sale (POS) machine is no longer just an optional tool—it’s a necessity. From small retail shops to large restaurants, POS machines streamline transactions, track sales, manage inventory, and provide valuable insights into your business operations. If you’re new to POS systems, this step-by-step guide will help you set up your POS machine with ease.
What is a POS Machine?
A POS machine is a hardware device that allows businesses to process payments made via credit/debit cards, UPI, or digital wallets. Modern POS systems often come integrated with software for inventory management, billing, reporting, and customer management, making them indispensable for efficient business operations.
Benefits of Using a POS Machine
Faster Transactions: Reduce queues and waiting times.
Accurate Billing: Eliminate human errors in manual billing.
Inventory Management: Track stock in real-time.
Sales Reporting: Generate detailed reports for better decision-making.
Enhanced Customer Experience: Accept multiple payment methods seamlessly.
Step-by-Step Guide to Setting Up Your POS Machine
Step 1: Choose the Right POS System
Before setting up, select a POS system that suits your business needs. Consider:
Payment methods supported (cards, UPI, wallets)
Hardware options (portable, countertop, tablet-based)
Integration with billing and inventory software
User-friendly interface
Step 2: Unbox and Check Components
Most POS machines come with:
POS terminal or card reader
Power adapter and cables
Printer (if included)
Instruction manual
Ensure all components are present and undamaged before proceeding.
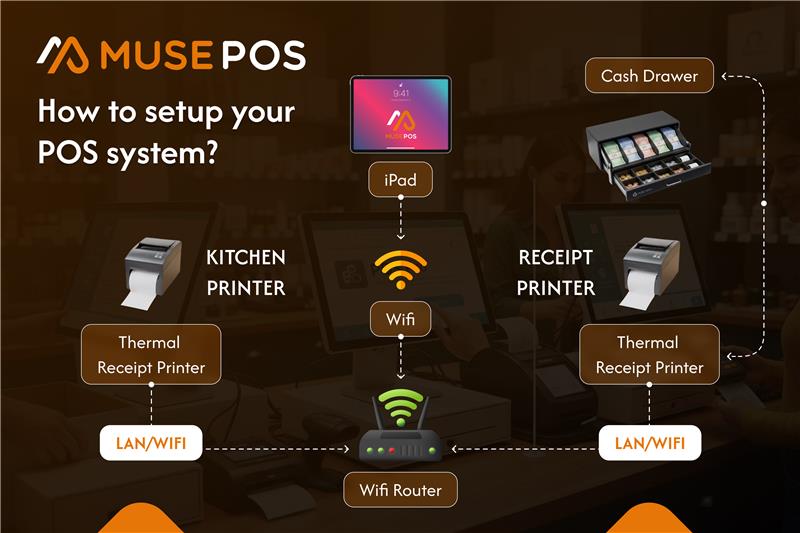
Step 3: Connect the POS Machine
Power On: Plug in the POS machine and switch it on.
Network Connection: Connect to the internet via Wi-Fi, Ethernet, or mobile data (SIM card).
Printer Connection: If your POS system has a receipt printer, connect it via USB or Bluetooth.
Step 4: Install POS Software
Many POS machines come with pre-installed software. If not:
Download the POS application from the manufacturer’s website or app store.
Follow the installation instructions.
Log in using your business credentials.
Step 5: Configure Settings
Set your business name, address, and logo for invoices.
Add products or services with prices.
Configure tax settings based on local regulations.
Enable payment options: card swipe, contactless payment, or QR code payment.
Step 6: Test Transactions
Before using the POS with real customers:
Perform a test transaction with a small amount.
Check if the invoice prints correctly and payment reflects in your account.
Troubleshoot any issues before going live.
Step 7: Train Staff
Provide basic training for employees on using the POS system.
Demonstrate how to process transactions, issue refunds, and generate reports.
Step 8: Regular Maintenance
Keep the machine updated with the latest software.
Clean the card reader and printer regularly.
Monitor connectivity and transaction logs for any discrepancies.
Tips for Smooth POS Operations
Always have a backup internet connection.
Keep a backup of transaction data.
Use secure passwords for software access.
Regularly review sales and inventory reports.
Conclusion
Setting up a POS machine is simpler than it seems when you follow the right steps. A properly configured POS system not only speeds up transactions but also helps you manage your business efficiently. By investing time in setup and training, you can ensure a smooth, error-free experience for both your staff and customers.
Leave a Reply